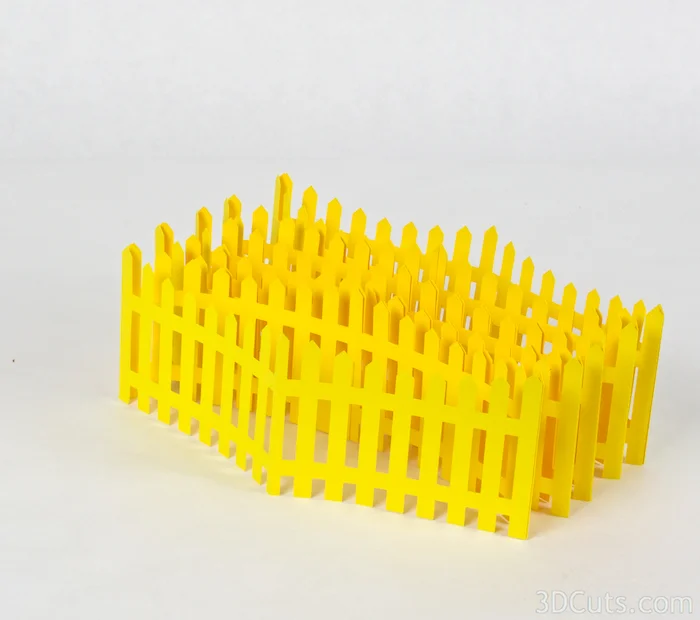
3D Expandable Picket Fence

3d Picket Fence Centerpiece cutting files by 3dCuts.com, Marji Roy designs 3D cutting files in .svg, .dxf, and .pdf formats for use with Silhouette and Cricut cutting machines, paper crafting files, complete tutorial included

Project Description:

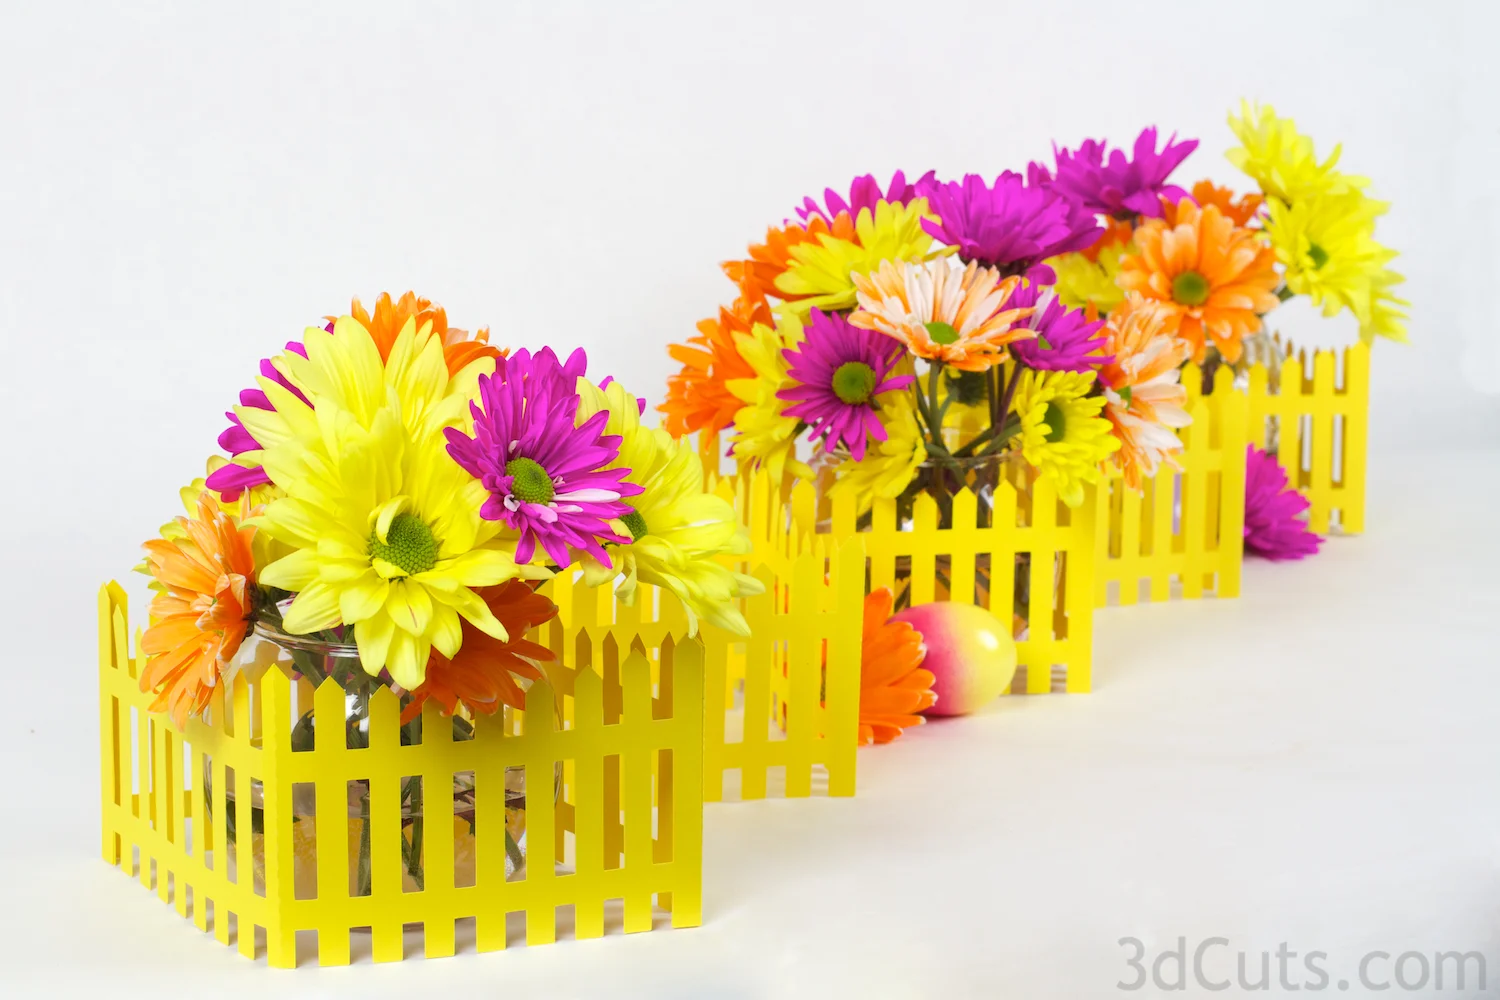
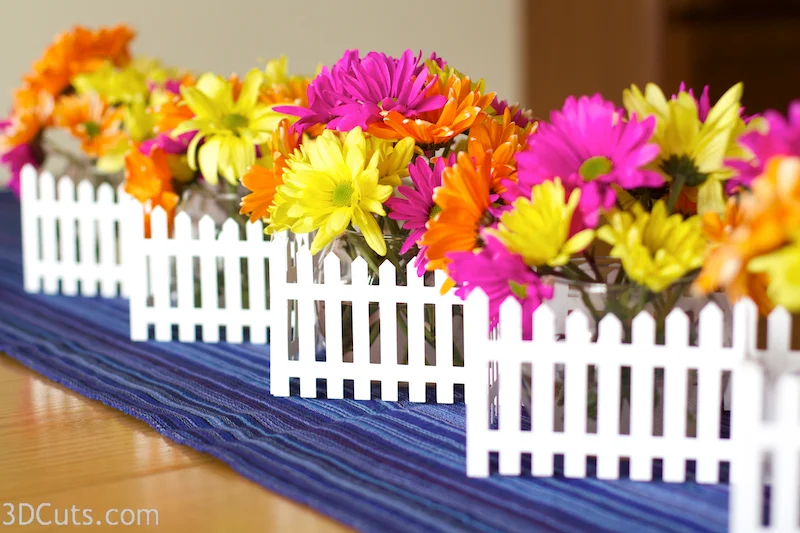
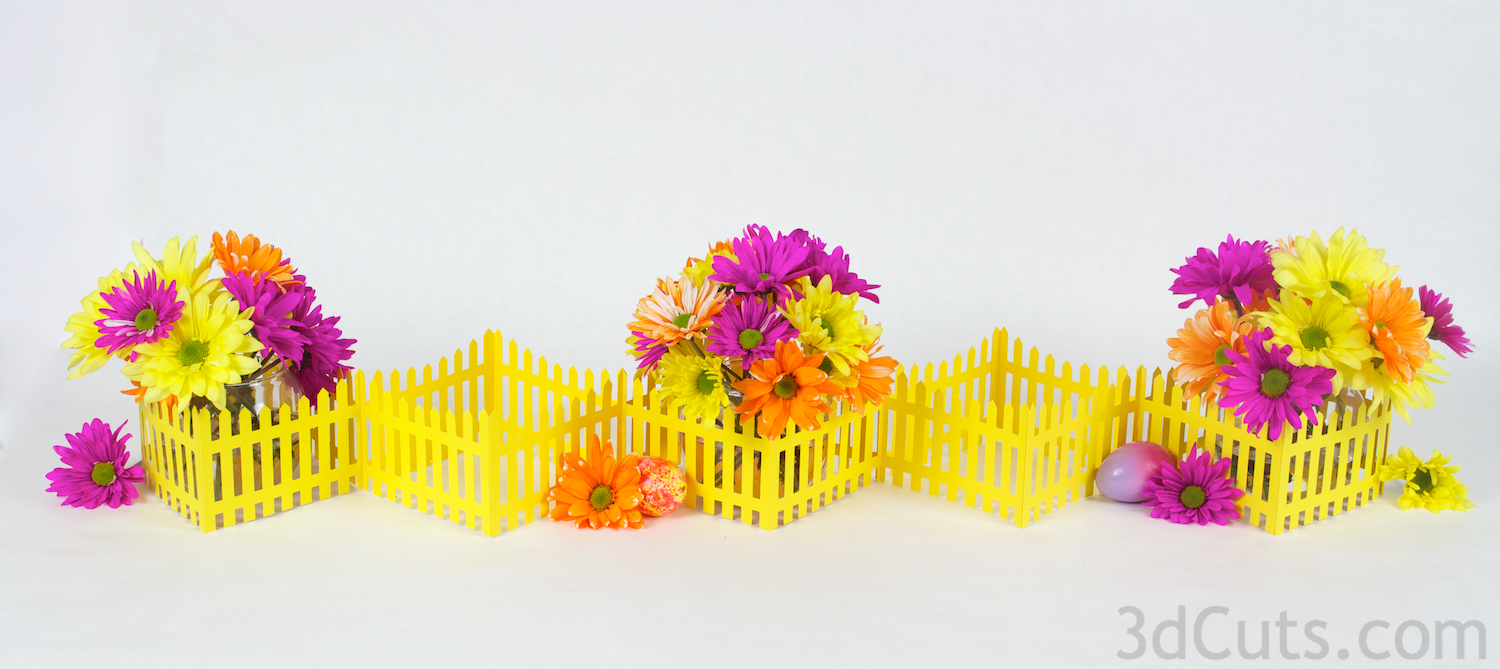
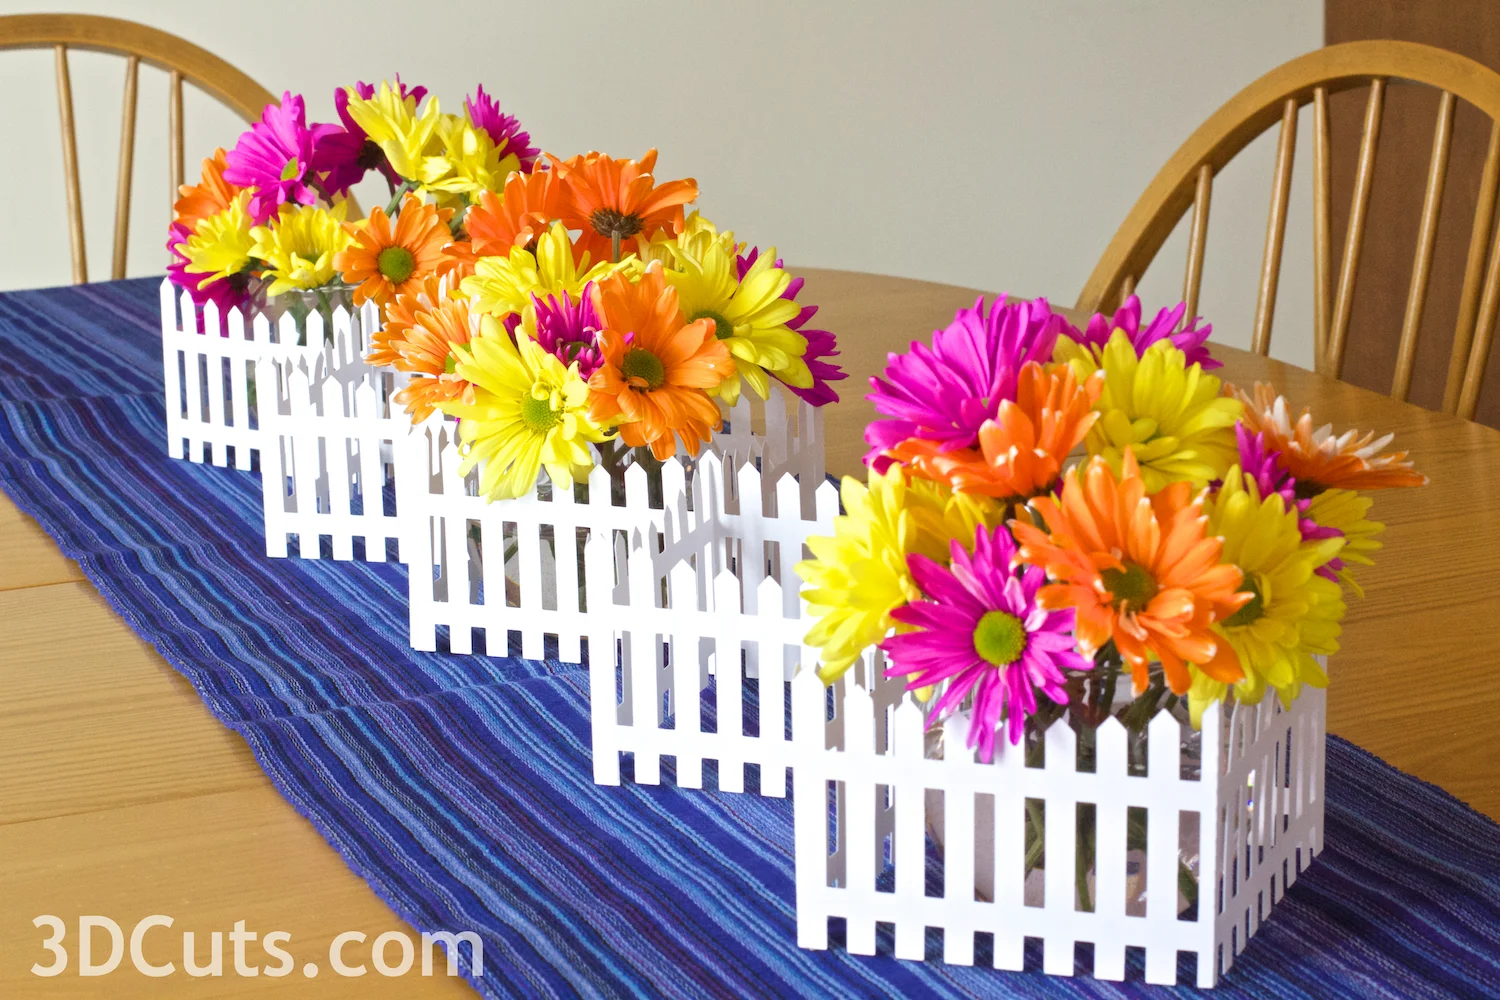
This expanding (and collapsable) picket fence is a element for creating a springtime table or mantle centerpiece. Add to it in a variety of creative ways. I've shown it here with flowers but consider putting Easter grass and eggs, or growing grass seed in containers in each square. Add paper crafted tulips, or for a contemporary setting, just display the fence. Be creative!

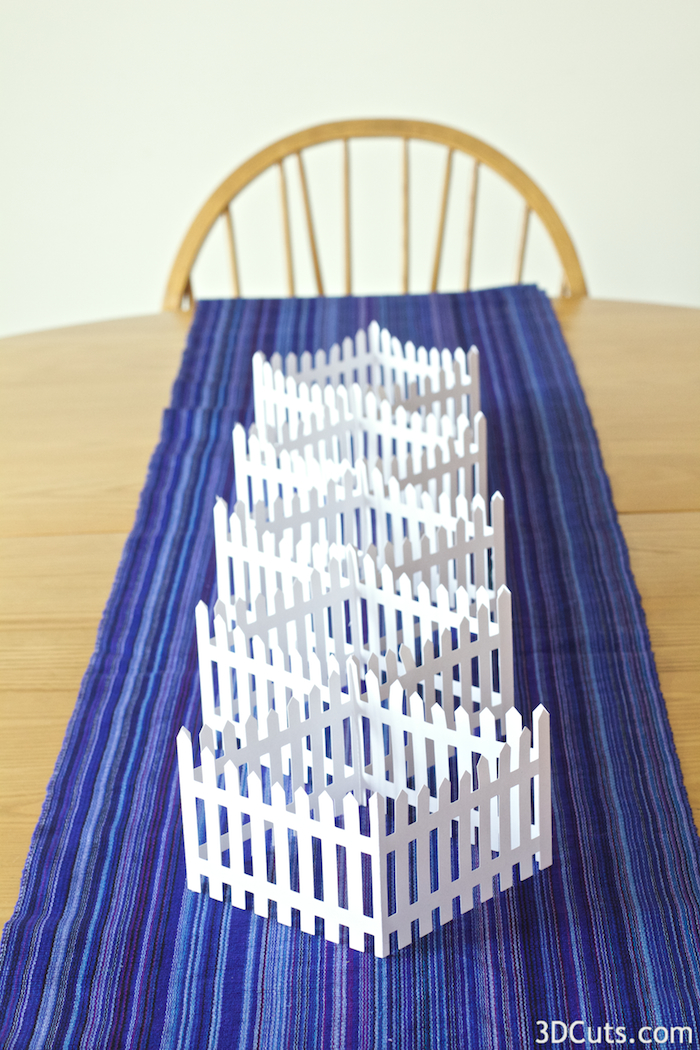
The file can be created with the five squares as shown. It stands about 3.75" tall and is 36" long  but you can leave 1 or 2 squares off or add 2 for a longer table. Adjust it for your display needs.


3D Picket Fence Tutorial

3d Picket Fence Centerpiece cutting files by 3dCuts.com, Marji Roy designs 3D cutting files in .svg, .dxf, and .pdf formats for use with Silhouette and Cricut cutting machines, paper crafting files, complete tutorial included

Supplies Needed:

  • Cutting File available here.
  • 8.5 x 11" card stock - I used the 65lb Cardstock from Recollections. Each fence square takes 1 sheet of card stock
  • Adhesive - I prefer Scor-Tape or a tape runner for this type of project

Parts sizes: (For those importing into Design Space) - in inches

  • Fence Squares - 2 pieces grouped together are 7.33" w X 10.41" h. Cut 1 pair for each square in your fence.
  • Fence Ends - 2 pieces grouped together are 7.33" w X 10.77"h. Cut 1 pair for each center piece.

3d Picket Fence Centerpiece cutting files by 3dCuts.com, Marji Roy designs 3D cutting files in .svg, .dxf, and .pdf formats for use with Silhouette and Cricut cutting machines, paper crafting files, complete tutorial included

Steps for completing the 3D Picket Fence:

1. Download the cutting files for your cutting machine. The files are available here.

2. Load the files into your cutting software following the steps for your cutting machine.

3. Prepare the files:.

  • Click here for detailed steps on how to use .SVG files on your Silhouette (with Design Studio).
  • Click here for steps on how to use these .SVG files in Design Space with your Cricut Explore.
3d Picket Fence Centerpiece cutting files by 3dCuts.com, Marji Roy designs 3D cutting files in .svg, .dxf, and .pdf formats for use with Silhouette and Cricut cutting machines, paper crafting files, complete tutorial included


4.  Cut the files from the card stock of your choice.

I have cut the picket fence from the traditional white but also brilliant yellow. Color is your choice.

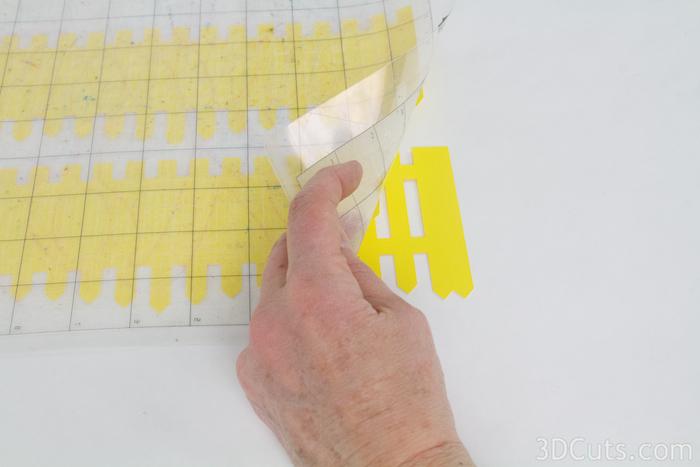
Important Technique Note: It is best to peel your mat away from the paper (and not the paper away from the mat). When you peel the mat away, the card stocks stays much flatter and that is needed for this project.


3d Picket Fence Centerpiece cutting files by 3dCuts.com, Marji Roy designs 3D cutting files in .svg, .dxf, and .pdf formats for use with Silhouette and Cricut cutting machines, paper crafting files, complete tutorial included

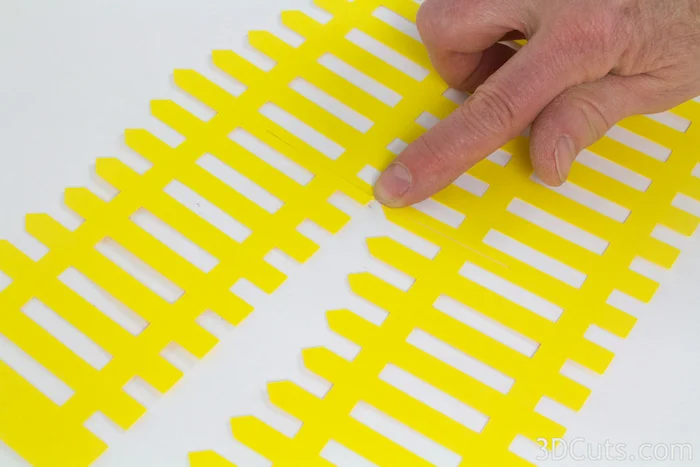
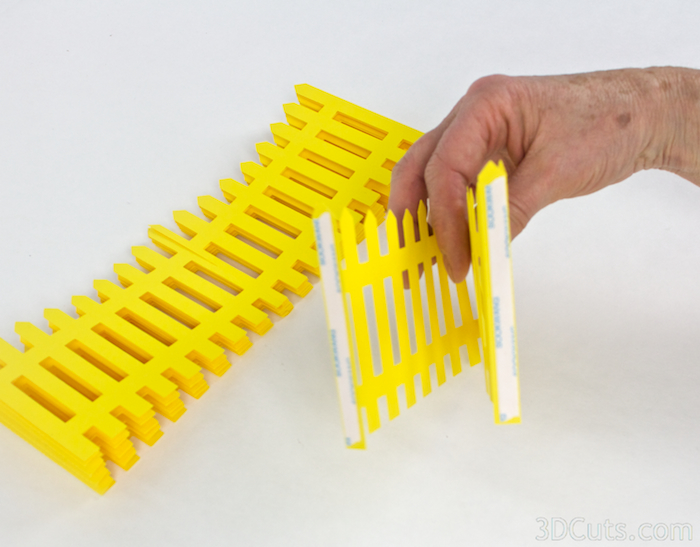
5. Assemble and fold 4 sets of fence X's to become squares.

3d Picket Fence Centerpiece cutting files by 3dCuts.com, Marji Roy designs 3D cutting files in .svg, .dxf, and .pdf formats for use with Silhouette and Cricut cutting machines, paper crafting files, complete tutorial included
  • Notice the slits on each pair of fences. One slits in from the top, and the other from the bottom. These will slide together to form a fence X. I use this term "fence X" throughout the tutorial and it refers to the pair assembled to form the X.
  • You will have 1 pair for each square minus one of your centerpiece. Example, my example has 5 squares when complete so I have to make 4 sets of fence X's. If yours is 7 long, you will make 6.
  • Note: the end pieces have no slits in the center but instead have a dotted fold line up the center. These can be put aside and used last.

3d Cats by 3dCuts.com, Marji Roy, 3D cutting files in .svg, .dxf, and .pdf formats for use with Silhouette and Cricut cutting machines, paper crafting files, Halloween, Cozy Kitty, Classy Cat
  • Flatten the assembled fence X so that the fence pieces with the double picket is on top. There should be one double picket on the left and one on the right. These double pickets are the fold tabs.
  • Reposition your fence X until it lays flat with the 2 double pickets on top.


  • There is a dotted fold line up through the middle of the double picket. Fold UP and crease along that line on both the left and right sides.
3d Picket Fence Centerpiece cutting files by 3dCuts.com, Marji Roy designs 3D cutting files in .svg, .dxf, and .pdf formats for use with Silhouette and Cricut cutting machines, paper crafting files, complete tutorial included

3d Picket Fence Centerpiece cutting files by 3dCuts.com, Marji Roy designs 3D cutting files in .svg, .dxf, and .pdf formats for use with Silhouette and Cricut cutting machines, paper crafting files, complete tutorial included
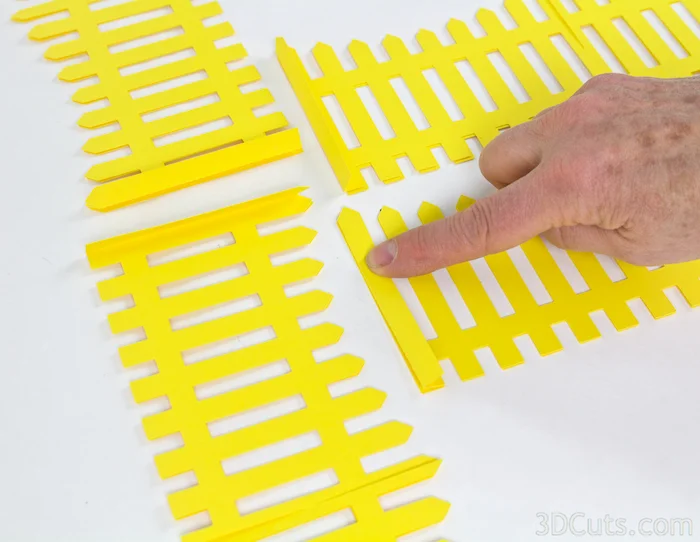
  • Repeat this for all pairs of fences.
  • My sample, because it will have 5 squares, has four pairs of fence X's.

3d Picket Fence Centerpiece cutting files by 3dCuts.com, Marji Roy designs 3D cutting files in .svg, .dxf, and .pdf formats for use with Silhouette and Cricut cutting machines, paper crafting files, complete tutorial included

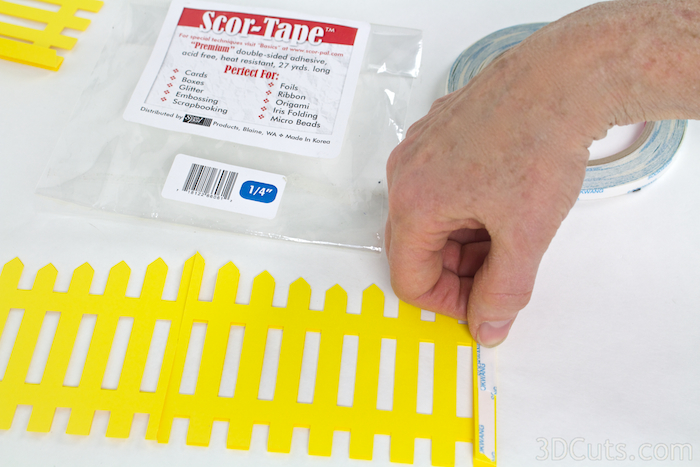
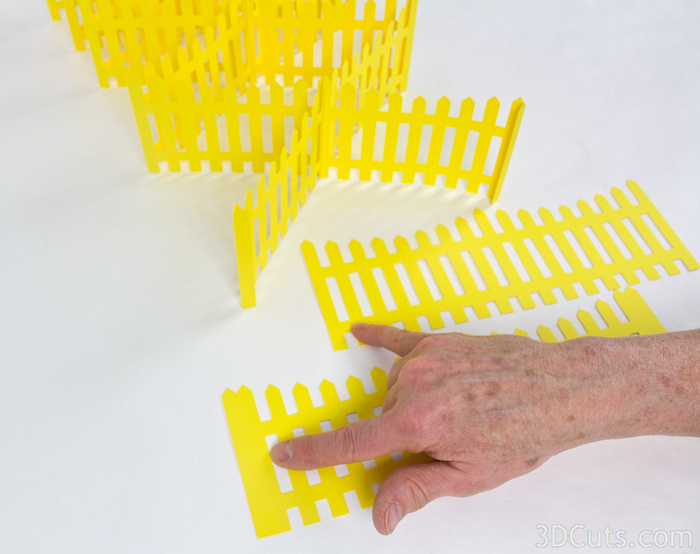
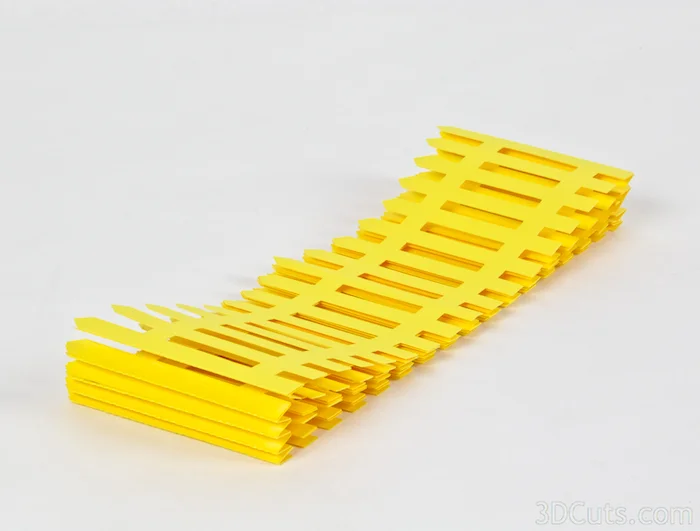
6. Glue each of the picket fence X's together in one stack.

  • Apply (but don't peel) a length of adhesive to the top side of the folded picket on both the left and right sides of one of the fence X's.
  • A note on paper adhesives: I especially like adhesives that keep my fingers dry and clean. Scor-tape and a tape runner are both excellent types of adhesives for this project. What you need is a strong paper glue for 3D work that is permanent. There are many other good choices. Use your favorite.

3d Picket Fence Centerpiece cutting files by 3dCuts.com, Marji Roy designs 3D cutting files in .svg, .dxf, and .pdf formats for use with Silhouette and Cricut cutting machines, paper crafting files, complete tutorial included
  • Peel the tape strip backing from just one side of the fence.


3d Picket Fence Centerpiece cutting files by 3dCuts.com, Marji Roy designs 3D cutting files in .svg, .dxf, and .pdf formats for use with Silhouette and Cricut cutting machines, paper crafting files, complete tutorial included
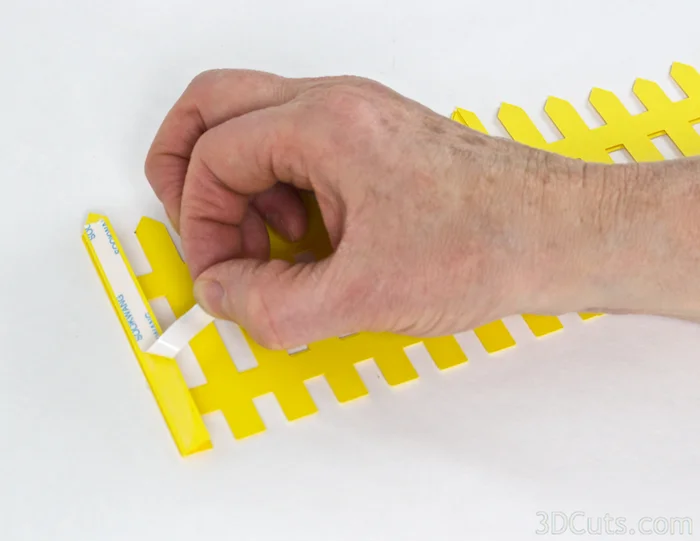
  • Important Note on Assembly: As you adhere these fence X's together proceed with care. If you want the fence to fold flat for storage you must place them to do so in this step. It also important to keep the bottoms lined up.
  • I found it easiest to stand the fence X with the adhesive strip up and then slide the left back edge of the next fence X into it. You glue the fence without the double picket to the double picket with the adhesive. The standing technique helped keep the bottoms aligned.

3d Picket Fence Centerpiece cutting files by 3dCuts.com, Marji Roy designs 3D cutting files in .svg, .dxf, and .pdf formats for use with Silhouette and Cricut cutting machines, paper crafting files, complete tutorial included
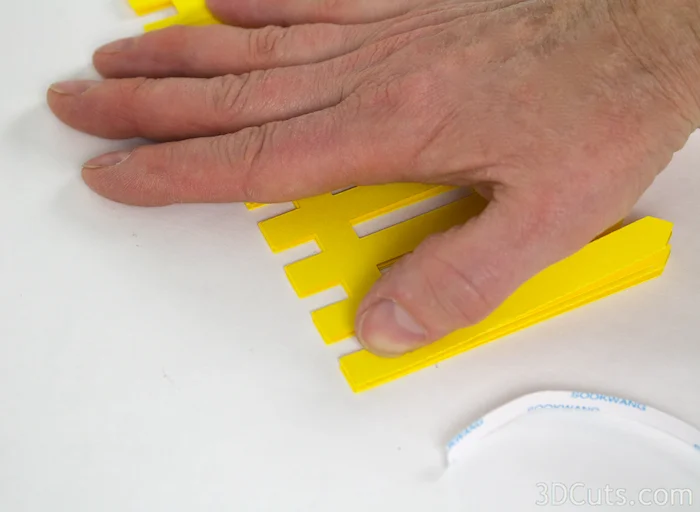
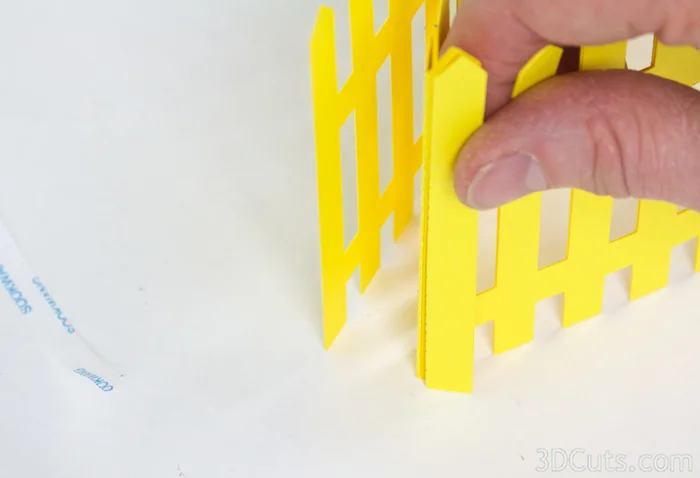
  • Peel the adhesive off the other end and flatten the entire stack together aligning bottoms. This is the step where it is important to not exactly align the end edges but to hold the stack flat as you adhere. This will allow the stack to again fold flat for easy storage.

3d Picket Fence Centerpiece cutting files by 3dCuts.com, Marji Roy designs 3D cutting files in .svg, .dxf, and .pdf formats for use with Silhouette and Cricut cutting machines, paper crafting files, complete tutorial included
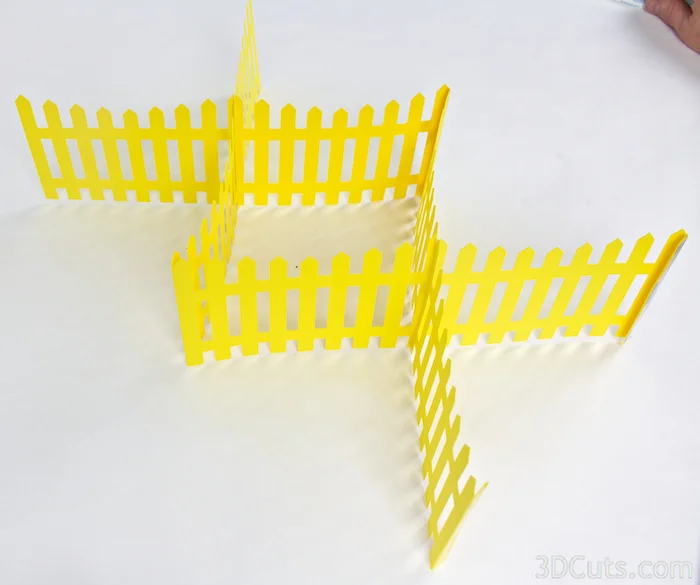
  • If you open up your stack, you will see the beginning of the fence expanding.


  • Adhere the next fence X to the first 2 by repeating the same steps.
    • Apply the adhesive to the double pickets on both the left and right.
    • Peel one and and adhere the next X to it keeping bottoms aligned.
    • Peel the other end and adhere keeping the stack flat.
3d Picket Fence Centerpiece cutting files by 3dCuts.com, Marji Roy designs 3D cutting files in .svg, .dxf, and .pdf formats for use with Silhouette and Cricut cutting machines, paper crafting files, complete tutorial included

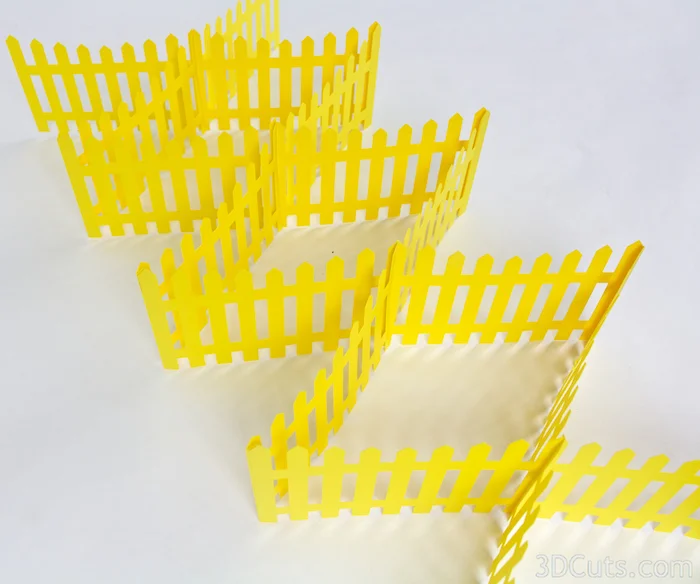
  • The fence will open and expand with both ends not yet finished.
  • Repeat for all the fence X's you assembled.
3d Picket Fence Centerpiece cutting files by 3dCuts.com, Marji Roy designs 3D cutting files in .svg, .dxf, and .pdf formats for use with Silhouette and Cricut cutting machines, paper crafting files, complete tutorial included

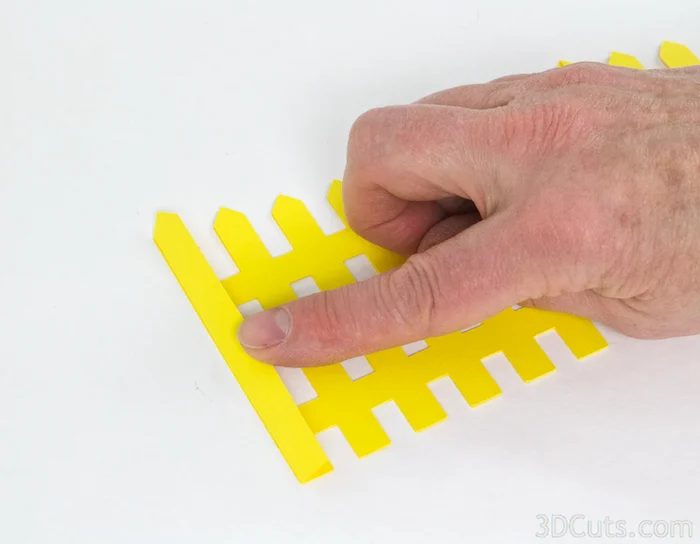
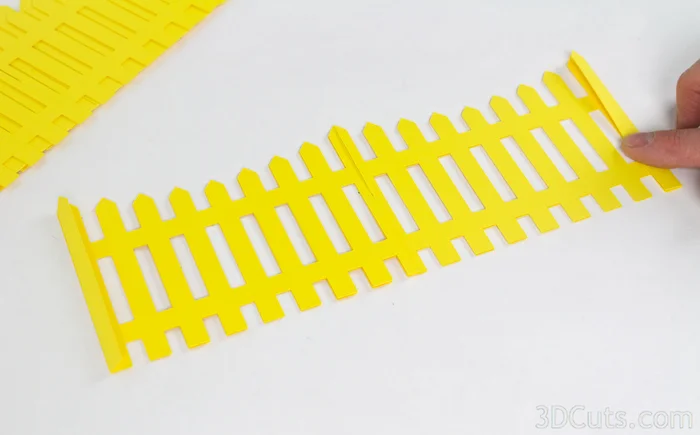
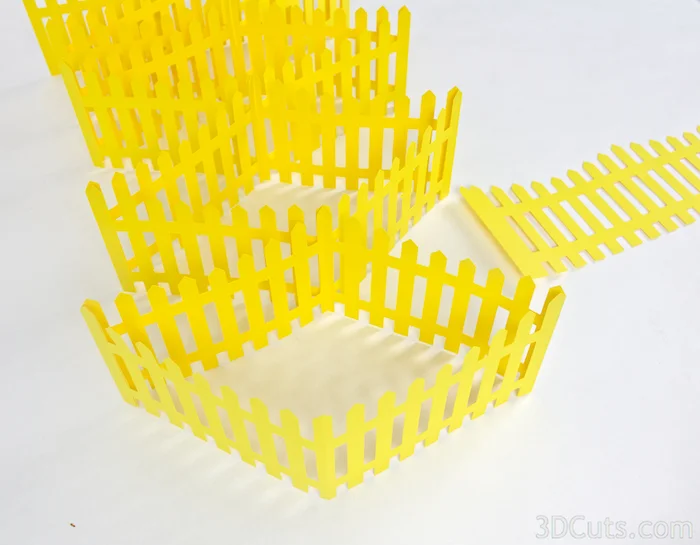
7. Adhere the closing ends.

  • Notice the difference between the two end pieces - one has a single picket on both ends and the other has a double picket.
  • Also notice the combined fences. One end piece has 2 double pickets and the other has 2 single pickets.
  • The end piece with the 2 single pickets get adhered to the fence X end with 2 double pickets.... AND... the end piece with 2 double pickets gets adhered to the X end with two single pickets.
  • Adhere both ends on to the stack of fence X's
3d Picket Fence Centerpiece cutting files by 3dCuts.com, Marji Roy designs 3D cutting files in .svg, .dxf, and .pdf formats for use with Silhouette and Cricut cutting machines, paper crafting files, complete tutorial included
PicketFenceCenterpiece_by_3DCuts_15

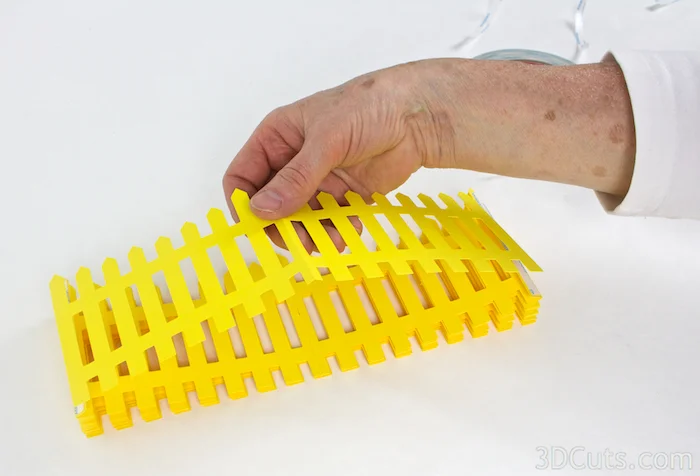
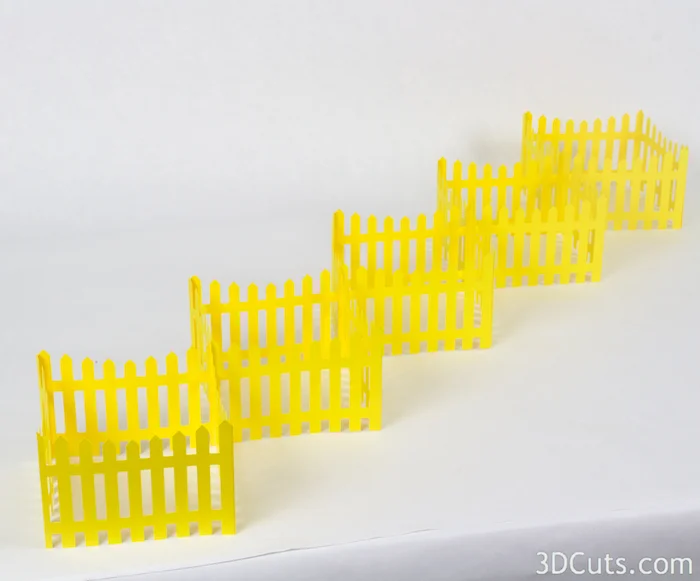
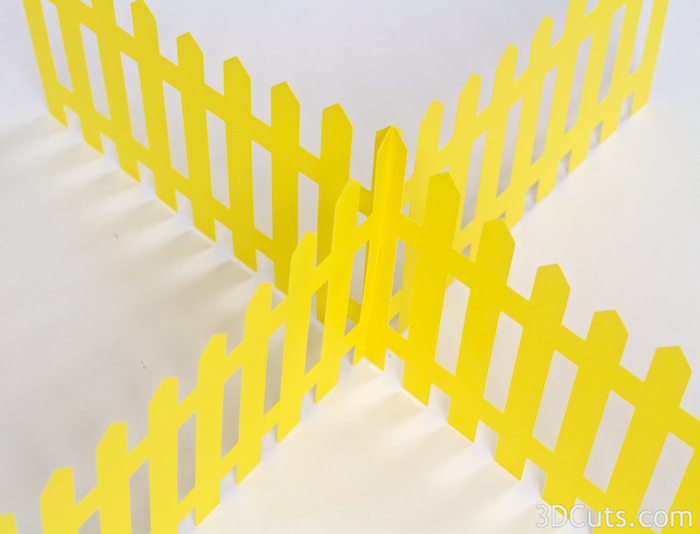
  • Your fence is complete and should open and closed and be able to be stored in an envelope!
3d Picket Fence Centerpiece cutting files by 3dCuts.com, Marji Roy designs 3D cutting files in .svg, .dxf, and .pdf formats for use with Silhouette and Cricut cutting machines, paper crafting files, complete tutorial included

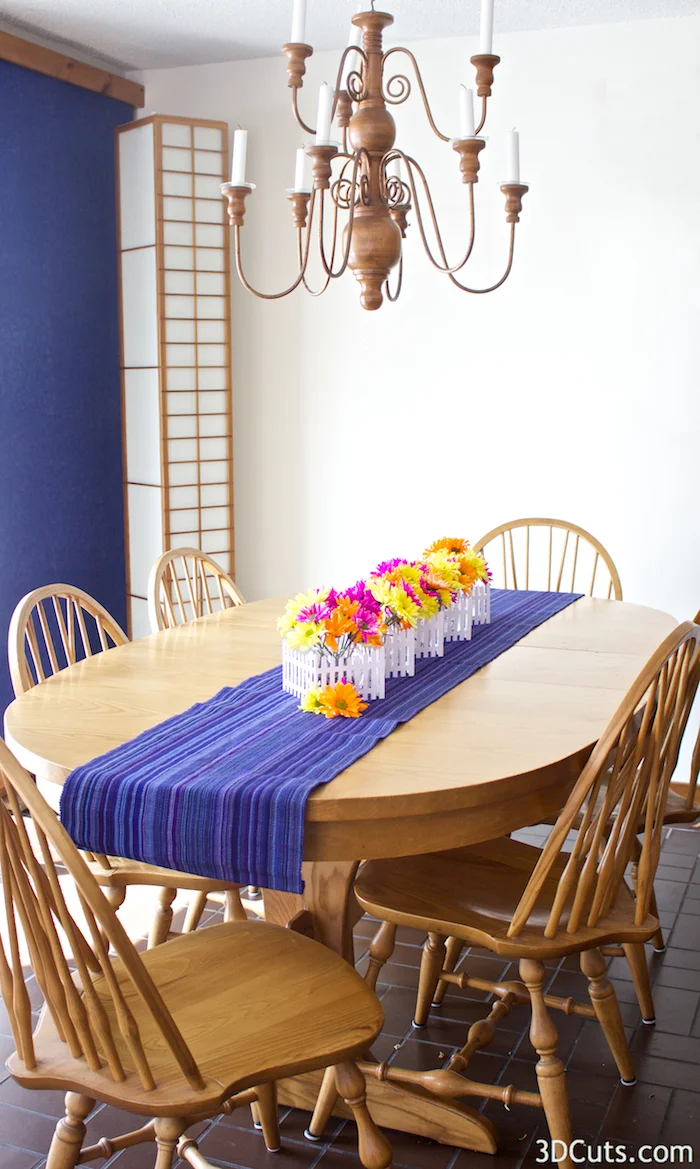
  • Now it is time to use the picket fence as the basis for a center piece.
  • It can be stretched on a runner down the center of your table, along a mantel, or on a console table. 
3d Picket Fence Centerpiece cutting files by 3dCuts.com, Marji Roy designs 3D cutting files in .svg, .dxf, and .pdf formats for use with Silhouette and Cricut cutting machines, paper crafting files, complete tutorial included

 
3d Picket Fence Centerpiece cutting files by 3dCuts.com, Marji Roy designs 3D cutting files in .svg, .dxf, and .pdf formats for use with Silhouette and Cricut cutting machines, paper crafting files, complete tutorial included
 

3d Picket Fence Centerpiece cutting files by 3dCuts.com, Marji Roy designs 3D cutting files in .svg, .dxf, and .pdf formats for use with Silhouette and Cricut cutting machines, paper crafting files, complete tutorial included


© 2015 Marji Roy, 3DCuts.com