
Swinging Girls Star Shadow Box Tutorial - with Videos

Project Description
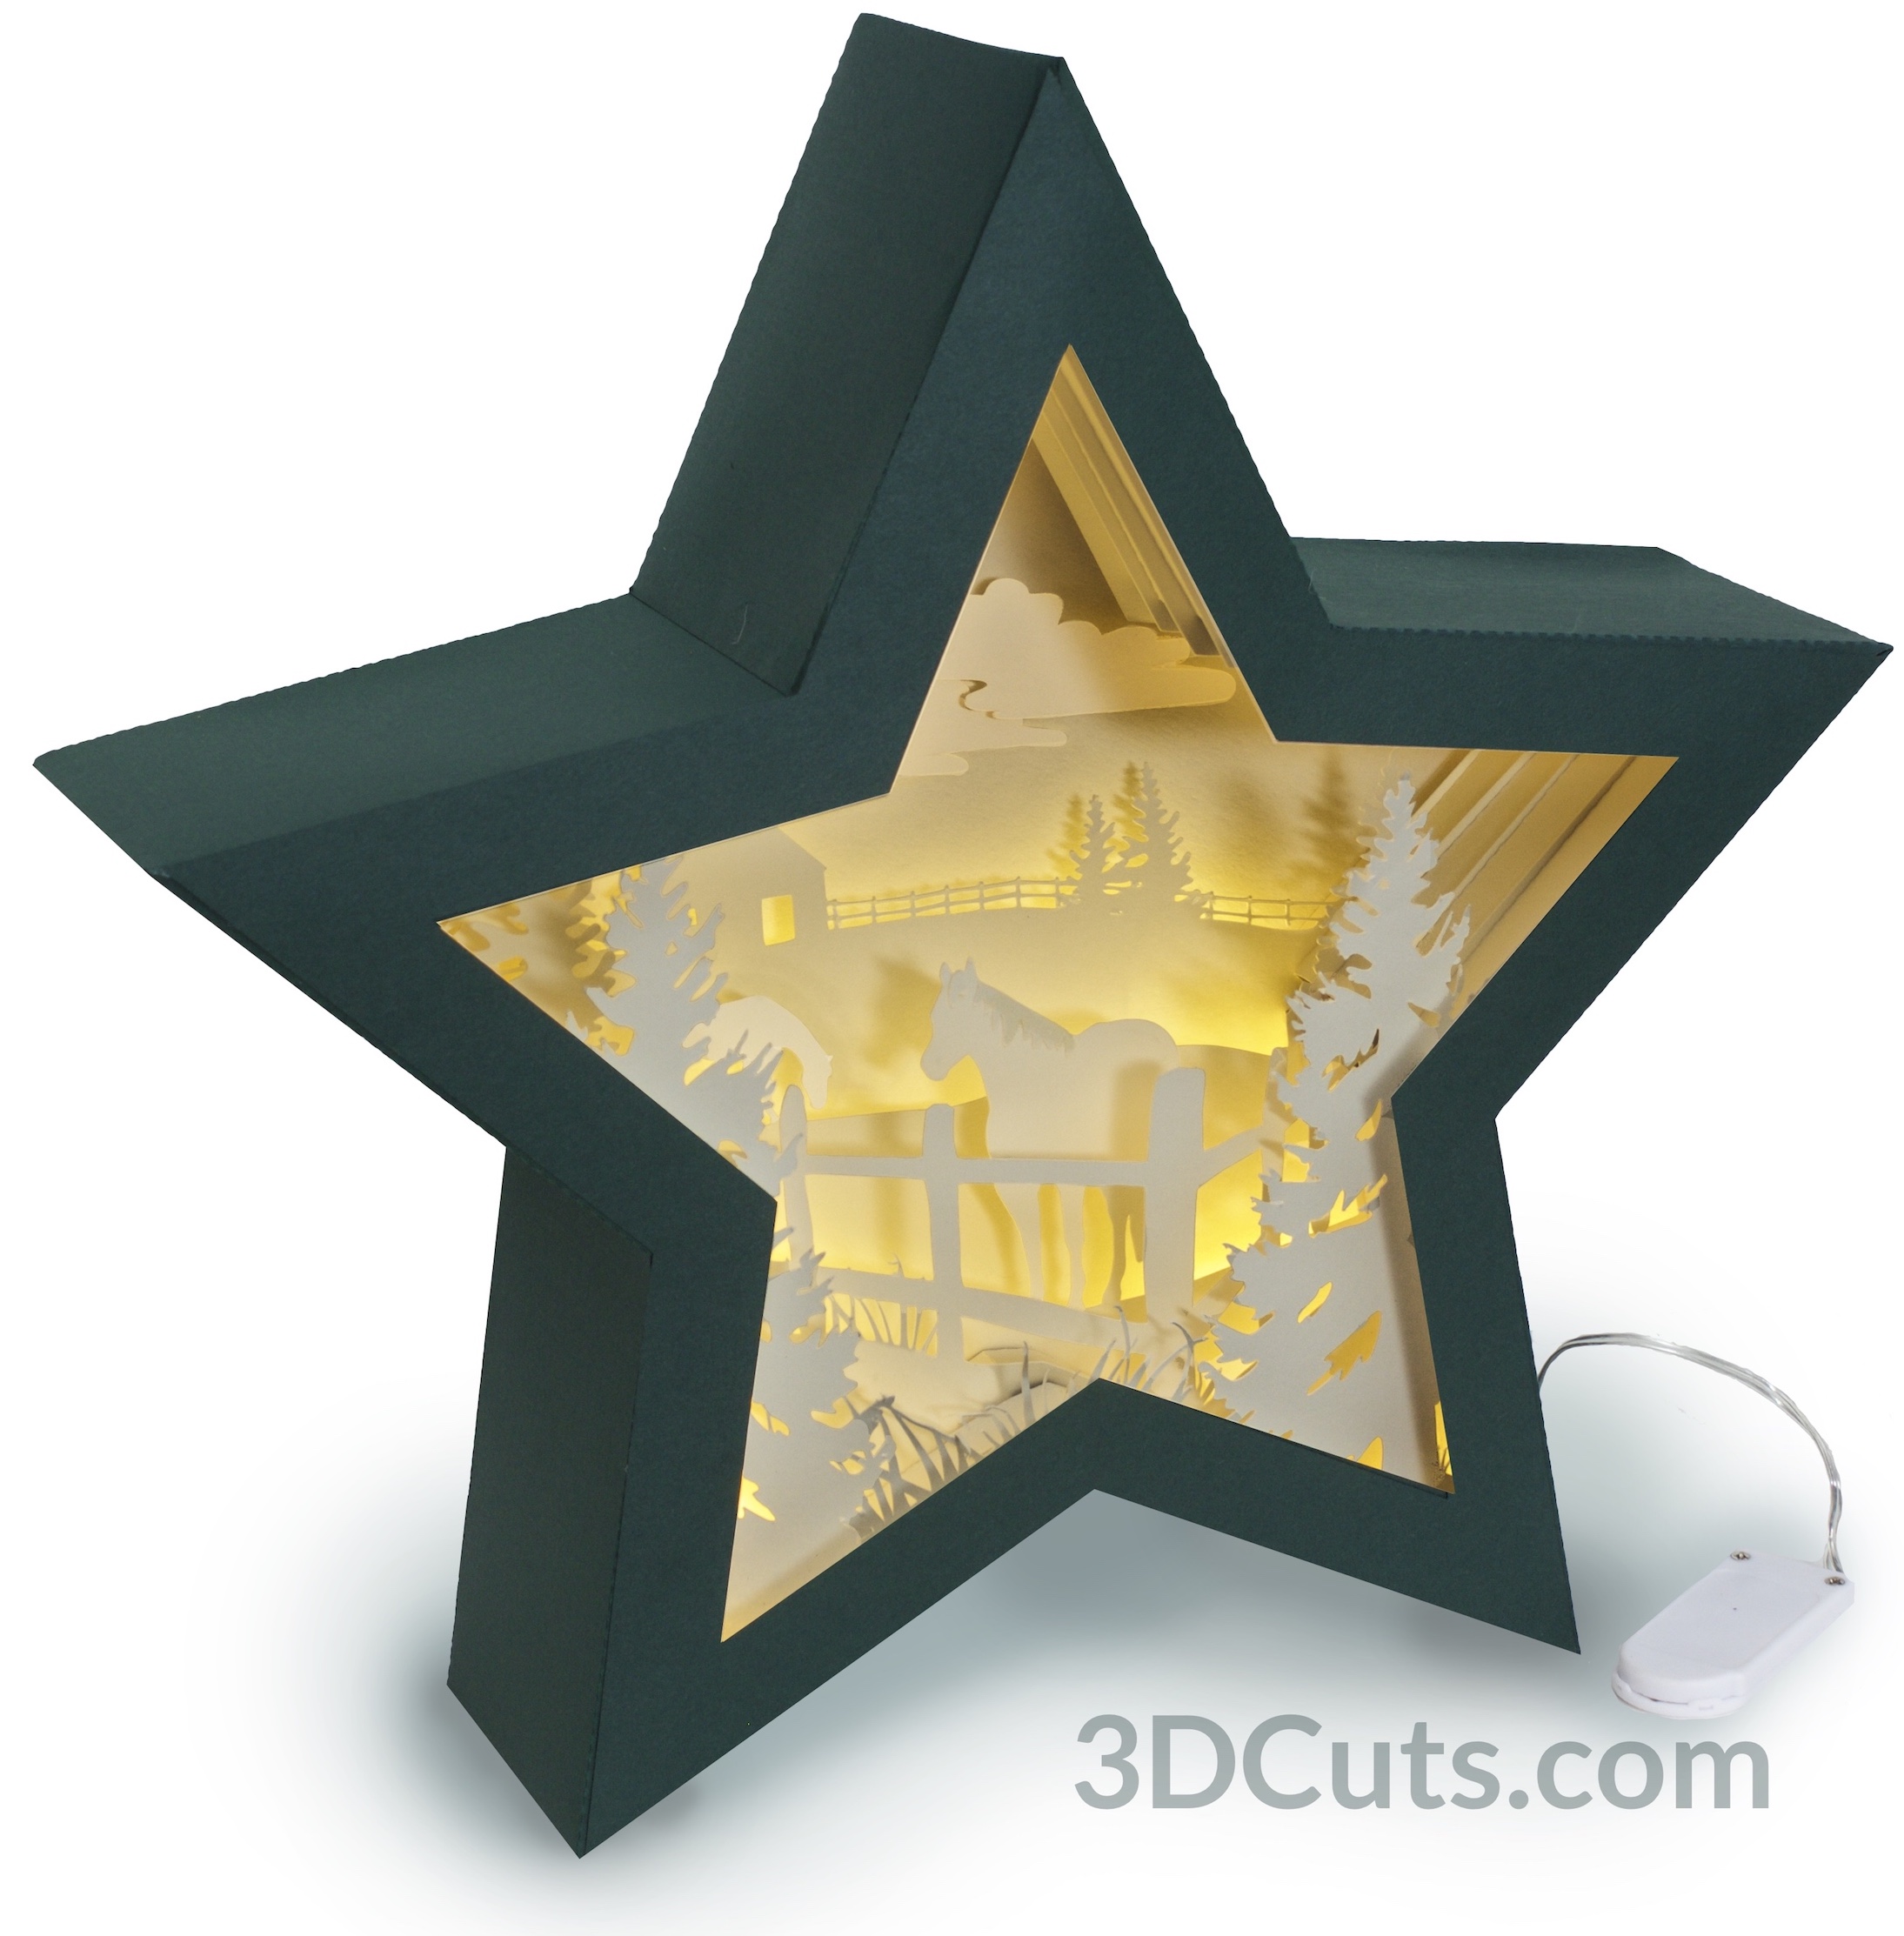
Make a stunning illuminated shadow box from card stock. This tutorial is for the assembly of the Swinging Girl Star Shadow Box. This tutorial incorporates text specifics along with a variety of assembly videos for the Star Shadow boxes This project uses card stock and mid-level construction techniques to assemble the 11" tall x 3" deep shadow box. It includes 5 internal layers and locations for optional LED fairy lights to provide a back glow in the sky. It is perfect for mantle, shelf or hall table.
Download cutting file here at 3DCuts.com:
- http://3dcuts.com/illuminated-shadow-boxes/swinging-girl
Note: This tutorial is not for the Star Nativity Shadow Box.
Supplies Needed:
- Cutting File available here from 3dcuts.com.
- 12 x 12" card stock 9 pieces needed for star frame
- 12 x 12" card stock - 7 light colored card stock for interior layers (ivory or white)
- 8.5 x 11 card stock - 5 matching color to interior for side supports (ivory or white) or 3 more 12 x 12"
- Tape Adhesive - I used Scor-Tape (1/4")(Link below)
- Liquid adhesive _ I used Art Glitter Glue
- String of 20-24 LED fairy lights- battery operated (optional)- Link below
- Scotch Tape
- Glue dots
- Foam Pop-dots
- Binder Clips
Parts Sizes: (need for dxf files)
- Star Frame Front open- 11.3375" W x 10.7187" H
- Star Frame Back solid - 11.3375" W x 10.7181" H
- Layer 1 - 11.0833" W x 10.4792" H
- Layer 2 - 11.0833" W x 10.4792" H
- Layer 3 - 11.0833" W x 10.4792" H
- Layer 3 tree & girl - 5.42161" W x 8.1245" H
- Layer 3 girl on swing - 2.0183" W x 2.502" H
- Layer 4 - 11.0833" W x 10.4792" H
- Layer 5 - 11.0833" W x 10.4792" H
- Star Side - 4.0014" W x 8.6389" H
- Side Braces (All) - 3.0754" W x 8.3371" W
- Insert - .48" W x 6.5" H
- Accessories - random sizes that are flexible
Links to supplies on Amazon:
- Order from Amazon: 3D Pop Dots Square 1/4 inch (Affiliate Link)
- Order from Amazon: LineCo Neutral Ph Adhesive (Affiliate Link)
- Order from Amazon: Art Glitter Glue with metal tip (Affiliate Link)
- Order from Amazon: Premium Silhouette Blade (Affiliate Link)
- Order from Amazon: Scor-Tape 1/4” 3 rolls (Affiliate Link)
- Order from Amazon: CR2032 Lithium Batteries for LED Tea Lights (Affiliate Link)
- Order from Amazon: 6 Pack of 20 Micro LED Fairy Lights in Warm White (Affiliate Link)
Steps for Completing the Swinging Girl Star Shadow Box
Special Note: I update the instructions online. Check here for adjustments and additional information. Don't just rely on the pdf file that comes with the download. Learned hints are added to the online tutorial.
1. Download the cutting files for your cutting machine here from the 3dcuts.com store.
2. Load the files into your cutting software following the steps for your cutting machine.
3. Prepare the files:.
- For the Silhouette: The SVG files from this site will need to be turned into cutting files. Click here for detailed steps on how to use SVG files on your Silhouette. http://www.3dcuts.com/tutorial-upload-svg-silhouette
- DXF files can be opened in the basic edition of Silhouette Design Studio but often require modifications. I recommend using the Designer Edition and using svg files.
- For Cricut Explore: Here is a guide for importing into Cricut Design Space. http://www.3dcuts.com/tutorial-adding-3dcuts-files-to-cricut
- For Brother ScanNCut: The svg files will need to be transferred to files for your particular machine. You can change SVG files to FCM files at http://www.canvasworkspace.com/ or Google "How to import SVG files into a ScanNCut" for links to tutorials.
4. Cut the files.
- There are some fine lines. It is best to have good quality card stock and a good blade and mat. I use the Premium blade.
- Below is a diagram of all the parts, their names and how many to cut of each. You can also see matching colors. Refer to this chart when installing the layers to make sure you are consistent with left and right.
- Hint: There is a lot of cutting for this project. I started by cutting all the parts for the star frame (purple below). As I was assembling the star frame I was cutting the side braces (4 per page). As I was folding those and applying the Score-Tape, I was cutting the inside star layers and remaining parts. It worked well. On the Star sides 2 fit on each 12 x 12 paper. For the side braces I could get 4 on each 12 x 12 card stock.

Important Variations:

Have you constructed other designs in my Star Shadow box series? If so there are some variations in this design. I have added details below but watch for:
- Adding specific details to layers. (See step 6 below).
- Using a protective cover on fragile details. (See Optional step in step 7 below).
- Adding Gap covers during construction. (See Step 8 new below).
- Using Scor-Tape instead of scotch tape to hold LED lights in place. (Step 9 below).
- Customizing. (See Step 11 below). I added a dog, grasses and ferns after the frame was complete.
5. Build the star frame: This first video demonstrates the steps for completing the star frame. It is the same for all star shadow boxes including the Swinging Girl Shadow Box
6. Prep the Star layers 1-5 before building the star layers insert.
Each Star Shadow box has a different set of preparations for the layers. The following photographs demonstrate how to prep the layers for the Swinging Girl shadow box.
- Layer 1 - (Pine tree and grass) - no prep necessary.
- Layer 2 - (Small Tree on Right) - Adhere the separate piece of cut grass in front on the tree base. Glue the base and leave the blades free to curl forward slightly.
- Layer 3 - (Plain land without details) - See below for step by step instructions on this layer.
- Layer 4 - ( 5 pine trees) - No prep necessary.
- Layer 5 - (6 pine trees) - No prep necessary.
- Other details: I added a dog and some ferns after the shadow box was completely assembled.
7. Prep layer 3:
- There are two pieces that are of the girl and the swing. One is just the girl and swing and the other includes the tree. The piece that includes the tree is the main piece. The other piece is to be glued directly behind matching part of the main piece. The addition of the second layer plus the glue greatly strengthens the fragile yet important area.
- I used Art Glitter glue and spread a light coat all over the front of the smaller piece being sure to get it on the ropes.
- I then attached this to the back of the larger piece working quickly yet carefully so I got near perfect alignment.

- Next, adhere the tree with a swinging girl to the front of Layer 3. The edges of the partial star line up so you can get accurate placement.
- I used Art Glitter Glue for the top but then I used a few glue dots for the base of the tree. I wanted the tree to be raised a little bit from the surface and glue dots give just a little depth and definition.
- Put this to the side to dry.

- Optional step:
- While layer 3 dries you can start building the star insert below as demonstrated in the video. BUT....... Before you work with layer 3 (and after it is dry) you might want to put a protective cover over the girl on the swing. I just cut two pieces of scarp card stock - smaller than the frame, staying away from the edges, and I used REMOVABLE scotch tape to temporarily hold these in place. You want to protect the integrity of this part of the design and this temporary cover helps. It prevents you from accidentally catching the swing with a finger and tearing the paper ropes.
- You can carefully remove this protective piece after the entire insert is together but before you put the insert into the star frame.

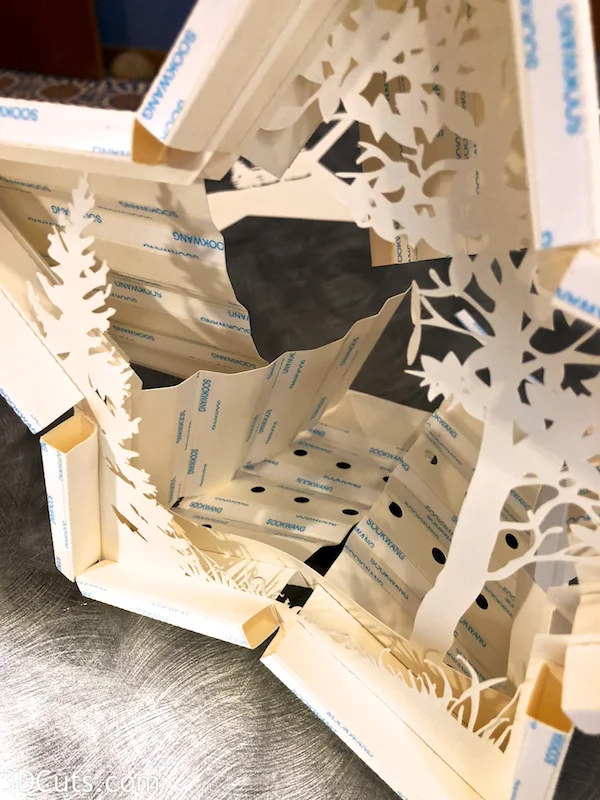
8. Build the layers insert.
- Follow the Part 2 video below for building the insert stack. These same steps apply to all my latest Star Shadow boxes including Swinging girl. If you would prefer to look at still pictures, the tutorial for the Deer in the Forest Shadow box included step-by-step photos of this process. Here is a link http://3dcuts.com/deer-in-forest-star-shadow-box-tutorial
- There a several diagrams I created to help with this process and I refer to them in the video.
- The first is this side view diagram of the folds of the side bracket and how the various layers will be inserted.

- The second diagram is this one showing the numbers on each segment of the side bracket. These numbers correspond with the numbers I use in the video.
- Also note, each segment that should have Scor-Tape added is marked in pink.

New Steps not included in the video:
Please note that each time I make a new shadow box I discover new hints for making the assembly easier. In this video I show you a trick for how to speed up the applying of tape.
I have also learned that it is easier to apply the gap covers as you build the star and not after it is done.
- After you have successfully attached layers 1 and 2 together with all their side supports, stop the video. You will notice there are gaps in the center of each star joint.
- Don't do anything with those in the front of layer 1. (You will cover these at the end but you need access to those spaces to help adhere the finished star insert into the star frame during final assembly.)
- But it is a whole lot easier to add the gap covers as you build and not wait until the entire star insert is complete.
- You will want to add gap covers to some of the gaps between layers 1 and 2. The important ones are the one on the left side, the center bottom and the right side. The two top ones really aren't visible so covering those isn't necessary.
- In this design I have also increased the size of the gap covers so the edges aren't visible.
- Add score tape to the back of the gap cover and position it to cover the gaps. Adhere in place.
- Do this gap coverage to the 3 gaps between layers 1 and 2, 2 and 3, and the side ones only between 3 and 4. Be careful to NOT cover any round holes along the bottom edges. Cut the inserts to prevent covering the holes between 2 and 3.

Middle gap

Left side gap

Right Side Gap
Now, on to the video of the steps for building the insert. Take heart. It appears complex but it very quickly sorts itself out into an easy to follow pattern.
Here is the second video - Part Two - Star Shadow Box Insert:
The video shows the Heart Tree Shadow box. The steps for assembly are the same for the Swinging Girl Shadow box. But preparing the layers is different. In Video 2 the section from 14:00 - 17:00 deals with the layers of the Heart Tree Shadow box. You can skip those for the Swinging Girl Shadow Box and instead refer to the layer prep instructions above.
9. Add the LED Fairy lights.

Path for stringing fairy lights.Start at the left lower circle.
- Note: If you put a cover guard over part of the design, now would be the time to carefully remove it.
- The following video shows how to install the LED Fairy lights.
- To the right is a diagram of the path I used for the Swinging Girl. It does vary some from the one shown in the video for the Heart Tree Shadow box.
- Another variation I found helpful was I used Scor-Tape to hold the wires in place instead of scotch tape. I left the backing on. I found it easier to use because it is 1/4" wide and fits into the grooves easily. Notice in the image below how I added the tape in many locations to firmly hold the wires and lights in position. None of this is visible when completed.
- The lower right photo shows how I taped the final three lights in place behind layer 5, again using Scor-Tape


Below is the third video in this series showing how to add the LED fairy lights to the shadow box.
10. Part 4 - Star Shadow Box Finishing Up!
11.Added Details:

After I was completed I decided to add some additional details. I included these in the cutting file. Adding them to your shadow box is optional. (Or adding other details of your own design is appropriate as well.)
Best Friend:
- I decided to add a dog to the scene. I just put a few glue dots behind his lower part and adhered him to the front of layer 3. You could search for an svg of a different type of dog to add here.
Grasses:
- I added a bunch of grasses in front of the tree on layer 2. I mentioned this above so you might have already completed this step. If your forgot, it is fine to add it now.

Ferns:
I also adhered some ferns to each of the two front corners. Some I glued to the back of the purple frame. Others I glued to the front of layer one. The goal was to make a clump in each corner. I extended some out of the frame as well.


And now, turn on the LED lights and take a look!

- Here are three other star shadow boxes that are constructed using these same techniques.


©2018 Marji Roy, 3dCuts.com